What is Bevel Protractor?
A bevel protractor is a precision measuring tool used to measure angles. It consists of a circular protractor arm attached to a movable blade, which can be adjusted to align with the angle being measured. The tool typically features a graduated scale marked in degrees, allowing for accurate readings. Bevel-protractors are commonly used in fields like metalworking, woodworking, and engineering to ensure precise angle measurements for cutting, machining, and assembling materials. They can also be used to check the angles of existing objects.
Table of Contents
Also read: Best Vernier Caliper beginners guide 2025
What is the Bevel Protractor least count?
The least count of a bevel-protractor can be expressed in various angular units:
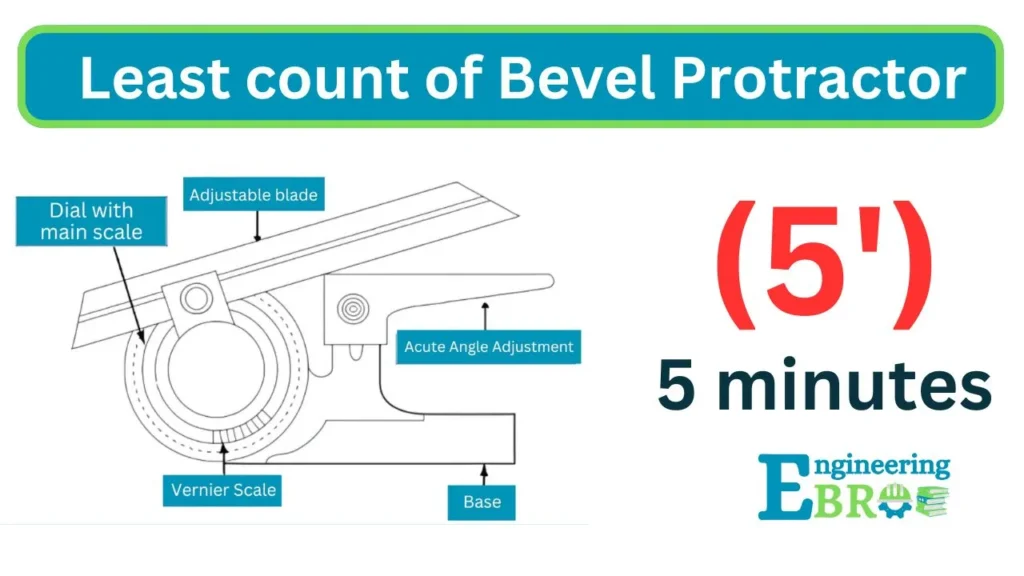
- Degrees (°): Commonly, 1° is the least count for many bevel-protractors.
- Minutes (′): One degree is divided into 60 minutes, so a protractor might have a least count of 5′ or finer.
- Seconds (″): One minute is divided into 60 seconds, so the least count can be expressed as 300″ (if measuring to the nearest 5′).
- Radians (rad): Since 1°=π1801° = \frac{\pi}{180}1°=180π radians, a least count of 1° translates to approximately 0.01745 rad.
For precise measurements, check the specifications of the specific bevel-protractor being used, as the least count may vary based on design.
Also Read :- List of least count of 15 measuring instruments
Bevel Protractor parts diagram

Types of Bevel Protractors
Standard Bevel Protractor: Search for “standard bevel-protractor” in Google Images or a similar search engine.
Digital Bevel Protractor: Look up “digital bevel-protractor” to see models with digital displays.
Vernier Bevel Protractor: Type “vernier bevel-protractor” for images showing the additional vernier scale.
Combined Bevel Protractor: Search for “combined bevel protractor” to see tools that integrate other measuring features.
Sine Bevel Protractor: Look for “sine bevel-protractor” to find examples that highlight precision measuring.
Step by step guide to How to use Bevel Protractor?
Step 1: Understand the Components
Before you begin, familiarize yourself with the bevel protractor’s parts:
- Protractor Body: The main arm that has a graduated scale.
- Adjustable Arm: The arm that can rotate and is used to measure angles.
- Locking Mechanism: Keeps the adjustable arm in place once set.
- Graduated Dial: Displays the angle measurements.
Step 2: Prepare the Tool
- Check Calibration: Ensure the protractor is calibrated correctly. When the arms are aligned, it should read 0 degrees.
- Clean the Protractor: Make sure there’s no debris or oil on the measuring surfaces.
Step 3: Setting the Angle
- Identify the Angle: Determine the angle you want to measure or set.
- Align the Base: Place the base of the protractor on one of the lines forming the angle. The straight edge of the protractor body should be aligned with one of the lines.
- Adjust the Arm: Gently move the adjustable arm until it aligns with the other line of the angle you want to measure.
Step 4: Lock the Angle
- Once the adjustable arm is aligned with the second line, use the locking mechanism to secure the arm in place. This will keep your measurement accurate.
Step 5: Read the Measurement
- Look at the graduated dial to see the angle measurement. Make sure to read it carefully, checking for any minor adjustments if necessary.
Step 6: Using for Construction or Marking
- If you’re marking an angle on a workpiece:
- Keep the protractor in place, and use a pencil to mark along the edge of the adjustable arm.
- This will give you a clear angle line to follow.
Step 7: Double-Check
- After marking or measuring, it’s good practice to double-check your measurement. You can do this by repositioning the protractor to confirm the angle.
Step 8: Clean Up
- After use, clean the protractor and store it properly to keep it in good condition for future use.
Tips for Success
- Practice: Familiarity comes with practice. Try measuring different angles to get comfortable with the tool.
- Take Your Time: Don’t rush the measurements; precision is key in engineering.
By following these steps, you’ll be able to use a bevel-protractor effectively for your engineering projects! If you have any questions or need further clarification, feel free to ask.